Transform Your Kitchen with a Cute Bear Paper Towel Holder: The Ultimate DIY 3D Print Project
There is something undeniably charming about adding a touch of whimsy to our daily routines. While we often focus on the functionality of our kitchen tools, the aesthetic appeal of these items plays a significant role in creating a welcoming and joyful home environment. Enter the Bear Paper Towel Holder, a delightful addition that seamlessly blends practical utility with adorable design. This unique 3D printable model transforms a mundane kitchen accessory into a piece of decor that sparks joy every time you reach for a towel.
Why Your Kitchen Needs a Characterful Accessory
In modern home organization, the line between purely functional items and decorative pieces is increasingly blurring. We no longer want to hide our paper towel rolls behind cabinets; instead, we want them to be accessible yet visually pleasing. A standard plastic or metal holder might get the job done, but it rarely adds personality to the space. The cute bear-themed paper towel holder solves this problem by turning a necessary chore into a moment of delight.
This project is more than just a way to hold towels; it is an expression of creativity. By placing a friendly bear head on your countertop, you introduce a playful element that can brighten up even the most utilitarian corners of your kitchen. Whether you are a parent trying to make cleanup fun for children or simply someone who loves a cozy, curated home, this holder serves as a perfect conversation starter.
Understanding the Design: Function Meets Form
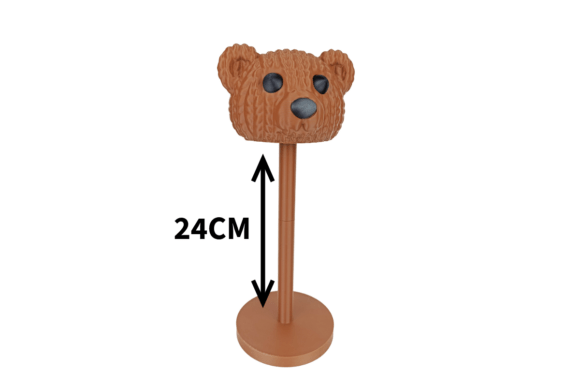
The engineering behind this STL file is both clever and user-friendly. Designed specifically to fit standard kitchen paper towel rolls, the holder ensures that your daily supplies remain within easy reach. However, the standout feature is undoubtedly the bear motif. The design incorporates a bear head where the eyes and nose are printed separately. This separation allows for a multi-color printing experience, enabling users to glue these features in place to create a striking color contrast against the main body of the bear.
One common misconception about complex 3D prints is that they must be printed as a single, massive object. Not so with this model. The design philosophy here prioritizes ease of assembly. The holder is constructed in multiple parts, which means you do not need a printer with an enormous build volume. Instead, you can print smaller sections and assemble them later. This approach reduces the risk of print failures and makes the project accessible to hobbyists with smaller machines.
Step-by-Step Guide to Assembly and Printing
Bringing this cute kitchen decor item to life requires a bit of patience and precision, but the result is well worth the effort. Here is how you can go from digital file to physical masterpiece.
Preparation and Printing
Before you start slicing your model, ensure you have the right materials. PLA (Polylactic Acid) is the recommended material for this project due to its ease of use, low warping, and wide range of available colors. To achieve the best surface finish, especially for the visible bear face, set your layer height between 0.16 mm and 0.2 mm. A finer layer height will result in smoother curves and less visible ridging on the bear's snout.
For structural integrity without wasting excessive filament, an infill of 10–15% is sufficient. This provides enough strength to support the weight of a full paper towel roll while keeping the print lightweight. If you plan to utilize the multi-color feature, you may need to pause the print or change filaments at specific layers to insert the colored eyes and nose.
Assembly Process
Once your printing is complete, the assembly phase begins. Follow these logical steps:
- Print all components: Ensure you have the base, the vertical support, the main bear head, and the separate eye and nose pieces.
- Assemble the structure: Attach the vertical support to the base. This forms the sturdy spine of your holder.
- Add the face: This is the creative part. Apply a small amount of super glue or a strong adhesive to the back of the printed eyes and nose.
- Position carefully: Press the eyes and nose onto the bear's face. Take your time to ensure they are symmetrical and aligned correctly. Once glued, they add the final touch of character to the piece.
Practical Relevance in Modern Daily Life
The significance of such a project extends beyond the novelty of the object itself. In an era where many households are embracing DIY culture and sustainable living, 3D printing offers a way to customize our surroundings without contributing to mass-produced waste. Instead of buying a generic holder that might break or look out of place, you can print exactly what you need.
Furthermore, this project fits perfectly into the realm of educational technology. For students learning about 3D modeling, this model serves as an excellent example of "design for manufacturing." It teaches the importance of tolerances, the benefits of part separation, and the value of considering post-processing techniques like gluing and painting. Parents can also use this as a collaborative project, teaching children about assembly, patience, and the satisfaction of creating something useful from a digital blueprint.
Maximizing the Potential of Multi-Color Prints
The option to print the eyes and nose separately opens up a world of customization. You are not limited to a monochromatic bear. Imagine a white bear with black eyes and a brown nose, or perhaps a pastel pink bear with contrasting features. This flexibility allows you to match the holder to your existing kitchen color palette or seasonal decorations.
When planning your print, consider the dimensions provided. The maximum towel roll height is 24 cm, ensuring compatibility with most standard brands found in grocery stores. This dimension is crucial because if the holder is too short, the towel will drag on the counter; if it is too tall, it becomes unstable. The designers have optimized this size to balance stability with accessibility.
Addressing Common Concerns
Sometimes, beginners worry that assembling a 3D printed object will be difficult. It is important to clarify that the Bear Paper Towel Holder is designed for ease of use. The parts are engineered to snap or slide together before being secured with adhesive. There are no hidden screws or complex mechanisms involved. The only tool required is a pair of hands and some glue.
Another concern might be durability. While PLA is strong, it can be brittle under extreme stress. However, for holding paper towels, which are relatively light, the 10–15% infill provides ample strength. If you anticipate heavy usage or want extra durability, increasing the infill to 20% is a simple adjustment in your slicer software. Additionally, using a high-quality glue ensures that the delicate facial features stay firmly attached even after years of daily use.
Conclusion: A Perfect Blend of Utility and Charm
The Teddy Paper Towel Holder represents the best of what 3D printing has to offer: the ability to create personalized, functional, and beautiful objects that enhance our daily lives. It proves that practical items do not have to be boring. By following the recommended print settings and taking care during assembly, you can create a centerpiece for your kitchen that is both a helpful tool and a delightful decoration.
Whether you are looking for a gift for a friend who loves baking, a fun weekend project for yourself, or a way to spice up your kitchen aesthetics, this cute bear design delivers. It invites you to slow down, engage with your tools, and appreciate the small details that make a house feel like a home. So, load up your printer, grab some colorful filament, and get ready to welcome a new furry friend to your countertop.